Friday, 8 November 2013

Geeky Tricks to Get The Most From Your Mac

Dock Tricks

Recent Items Stack

Stacks are quite the handy addition to your Mac’s dock and the good people at Mac OS X Hints figured out a way to make them even more useful by creating a stack that automatically contains your most recent applications.
These can of course be found under the Apple menu as well but it’s much more convenient to have them right in the dock.
To accomplish this feat, simply copy and paste the line below into Terminal.
defaults write com.apple.dock persistent-others -array-add '{ "tile-data" = { "list-type" = 1; }; "tile-type" = "recents-tile"; }'
Once you’ve completed that command, type “killall Dock” to relaunch your dock with the new stack.

Stacks List View

Use the snippet below in Terminal to activate a really nice looking list view in stacks complete with icons and a scroll bar.
defaults write com.apple.dock use-new-list-stack -bool YES
As with the previous example, use “killall Dock” to make the change take effect.

Resizing Your Dock

If you click and drag the little divider bar in your dock, you can resize the entire dock without going to System Preferences. Hold down option to make proportional changes.

Force Magnify Dock

If you’re like me and have dock magnification permanently turned off, you can temporarily activate it by holding down ⌃⇧ while hovering over the dock.

Desktop & Finder

Show Hidden Files

One of the most well known and widely used terminal commands. Use the snippet below to make hidden files visible in the Finder.
defaults write com.apple.Finder AppleShowAllFiles YES
Set it back to “NO” to re-hide the files.

Hide Your Desktop Debris

If you find yourself constantly embarrassed or distracted by your messy desktop habits, download Camouflage, a free app that quickly hides everything on your desktop.

Choose a New Library

There are several applications in OS X that allow you to choose or create a different library on startup. Simply hold down the option key when you click on an app in the dock to see a window similar to the one below

Sync Application Libraries Across Macs

Use the previous tip to create a new library for an application and place that library in your Dropbox folder. Then choose this library with the same application on any other Macs that you own and all the application data will remain synced between the two Macs!
This trick is completely free, just be sure to watch the size of the libraries you are syncing as it’s really easy to eat up all your Dropbox space.

Finder Window Shortcuts

It’s easy to miss that you can actually add item shortcuts to the top of your Finder windows. Simply drag the application into the space to the left of the Spotlight field.

Pimp Your Desktop

You may have caught a glimpse of my desktop in one of the images above and wondered how I could display weather, time and date as a part of my background. Using GeekTool you can add all sorts of functionality to your desktop. It’s everything Dashboard should’ve been.
Check out our recent GeekTool tutorial to get started.
If it’s all a bit too technical for you, check out Yahoo Widgets instead. They’re just like Dashboard widgets only you have the option to display them right on your desktop.

Stationery Pad

If you have files that you often use as templates but want to prevent accidental replacement of the original file, you can use the “stationery pad” option. Enabling this on a specific file makes it so that when you try to open that file, the Finder creates a duplicate and opens that instead.
To find this option, get info on a file with ⌘+I and click the “Stationery pad” checkbox under the labels in the “General” section.

Quick Look Zoom

While Quick Look is launched, hold down the option key to turn your cursor into a magnifying glass. Then click to zoom in. Hold shift and option to zoom out.

Screensaver

Screensaver Wallpaper

Have you ever wanted to set a screensaver as your desktop background? Well that’s a horrible idea for more reasons than I care to list. However, it turns out that it’s perfectly possible. Just use the following command in Terminal:
/System/Library/Frameworks/ScreenSaver.framework/Resources/ScreenSaverEngine.app/Contents/MacOS/ScreenSaverEngine -background
When you’ve had enough fun, hit Control+C to return things back to normal.

Saturday, 12 October 2013

Learn how to trade

Learn how to trade the way most successful traders that I know have become financially independent. This guide is the beginning of a series of articles that show you the most common path I know of to successful trading. There are a lot of people who want you to learn how to trade using their new discovery of a secret way of trading. I have seen many of these secret trading methods come and go over the last 14 years which I have been trading. The principals shown here worked 14 years ago and they work today.
This Learn How to Trade guide is designed to get aspiring traders pointed in the right direction. It is linked to additional articles on learning how to trade that will continue the journey. Beginning traders are sometimes dead set in their direction on learning how to trade using the misinformation that they have acquired from sources other than successful traders. I have been trading for well over a decade now and I know a number of good traders. The people I meet who are new to trading usually have a lot of misconceptions about trading that need to be cleared up before they can learn how to trade successfully. What makes a person successful in trading is setting correct expectations, doing some homework and practicing the needed skills.
learn how to trade
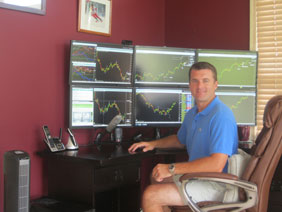
Trading is not gambling although some of the Game Theory mathematics that applies to gambling can be of some use in trading. Non-professional gamblers will generally not make good traders unless they approach trading differently than gambling. Professional gamblers sometimes approach gambling with a careful study of the game they are playing and Game Theory mathematics to get consistent results; these gamblers can be good traders. Trading may trigger some of the same addictive reactions that gambling does in some people but not for me. I hate to gamble but I love to trade. I view most forms of gambling as a waste of money but I view trading like a great game of golf. When I go to Las Vegas I see a lot of people putting their money on bets without really knowing much about what they are doing. They are untrained in the proper techniques that are needed to win at what they are playing. The casinos take their money without much difficulty. If one of these Las Vegas gamblers turns to science and becomes skilled at it then they will be permanently thrown out of the casinos. People who approach trading the way they lose money in Las Vegas are just throwing their money away. Being a trader is being a skilled professional.
However, trading is like being a skilled sports professional rather than a typical skilled craftsperson. A skilled craftsperson gets it right nearly every time in that his success rate is near 100%. If you play a professional sport you would not expect to achieve such high success rates, just having a winning season is often cause for much satisfaction. Once you know how to trade you can expect to achieve 57-59% winners. However, learning how to trade is learning how to accept your losses as well, which are 41-43% of your trades. Losing 41-43% of the time is not always easy because the losses are not always distributed evenly. There are times when you will have nine losers in a row and you still need to keep your cool and be confident that you know how to trade the next trade. You need to trade with careful risk management so that when you have a string of sequential losers you don't blow out your account. We will discuss proper risk management many times in this how to trade series because it is very important to your ultimate success. Most people who are unfamiliar with risk management strategies such as the Kelly Strategy will risk too much. Forty PH.D's were asked to play a gambling game where they would be guaranteed to win 60% of the time but at the end of 100 rounds only two had more then they started with because of poor risk management. You can get everything else right and still lose money unless you manage risk correctly.
learn how to trade
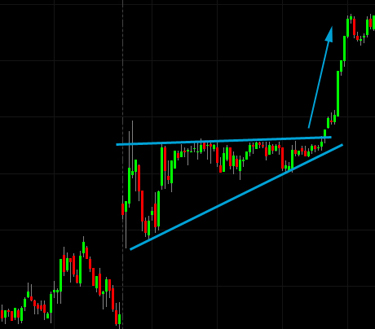
Learning how to trade is easier than many highly skilled professions but you will need to do your homework before you trade real money. Paper trade first and only after you have mastered paper trading should you slowly transition to real money (mixing some paper and some real). Paper trading today is done in an electronic simulation environment, not with real paper. When you trade you must do what needs to be done even though you may not want to do it. Human instincts are often wrong and you must learn to resist these feelings that will lose you money. The way probability works is important to trading but is different than your natural instincts will lead you to believe. The Gambler's fallacy, also known as the fallacy of the maturity of chances is the belief that your odds improve when an unusual series of losses occur or that your odds of winning rises when you have a losing streak. Some slot machine players will prefer slot machines that have not paid out in a while in the belief that the chance of a payout has now improved. Let's look at a coin flip example: if you are flipping a coin and you get "heads" four times in a row then your chances of getting "tails" on the next coin toss has improved. However, each coin toss is an independent event that is ignorant of every previous coin toss. Since the coin does not remember the previous string of heads it is not biased in the next toss. If fifty different people toss a coin in the air eight different times then the probability of at least one person getting all heads or tails is 32.44%. That person with all heads (or tails) probably had difficulty accepting the outcome but it is no less probable that the person who had exactly 25 heads and 25 tails which were evenly distributed.
Another example of how human intuition is wrong is the Monte Hall paradox and Bertrand's box paradox. You are in a game show, and you're given the choice of three doors: Behind one door is $1,000; behind the others, $1. You pick door No. 1, and the host (who knows the right answer) opens door No. 3, which has $1. He then says to you, "Do you want to pick door No. 2?" Should you switch your choice from Door No. 1 to Door No. 2? Most people would say no because their chance has not seemingly changed and Door No. 2 does not seem to offer any improvement in their chance of winning. People are more inclined to stay with their choice once made. Staying with your choice leaves you with a 1/3 chance of winning but changing to door No.2 increases your chances to 2/3. It is surprising and not at all intuitive but it has been shown to be true (hence the term "paradox"). As a trader you should learn what is true and re-train yourself to these truths while avoiding use of your natural human instinct. Why something works in trading is unimportant, that is an academic exercise for the curious; the fact that it works is all you need to know.
For many people it is hard to exit a losing trade and accept defeat. People who have been reasonably successful in their life would rather hang in there and work that defeat into a victory. This is a recipe for disaster in trading. After several disasters the aspiring trader then over reacts and starts exiting to soon. They want to exit a trade if there is any loss showing at all because the pain of past disasters puts them in a panic. Knowing how to trade means limiting your losers and giving your winners room to run (we will discuss this more later).
For this discussion "being long" means to own a stock, bond, or whatever. If you are "short" then you have sold it after borrowing it from your broker such that you can only profit on it if it drops in price.

Thursday, 12 September 2013

Add Watermark to a Word Document

Add Watermark to a Word Document

You can insert a watermark into a Microsoft Word document as either text or image.
Here is a sample Word Document with text watermark:
                                                                     DOWNLOAD

And here is an example of picture watermark:


Step-by-step to add a watermark to Word document (applied for Microsoft Word 97-2010):
Microsoft Word 97/2000/XP (2002)/2003:
  1. Open the Word document that you want to add watermark to.
  2. Select "Format" from the top menu, then select "Background", then "Printed Watermark".
  3. In the "Printed Watermark" dialog:

    A. To insert a text watermark:
    • Select the "Text watermark".
    • Then, either select a pre-defined text from the drop-down, or type in your desire text on the "Text" field.
    • Customize your watermark with other options in this dialog such as text size, text color, etc, then click "OK".
    • Watermark is now inserted into your document.

    B. To insert an image watermark:
    • Select the "Picture watermark".
    • Then click on the button "Select Picture...".
    • Navigate to the directory where your watermark picture is located. Select it and click "Insert".
    • Select a customized scale if desired, then click "OK".
    • The image is now inserted into your document as watermark.


Microsoft Word 2007/2010:
  1. Open the Word document that you want to add watermark to.
  2. Select the "Page Layout" Tab from the top menu
  3. In the "Page Background" group, select "Watermark".
  4. You can now select one of the pre-defined watermarks, or if you wish to use your own text/image, select "Custom Watermark" at the bottom.
    At the "Printed Watermark" dialog:

    A. To insert a text watermark:
    • Select the "Text watermark".
    • Then, either select a pre-defined text from the drop-down, or type in your desire text on the "Text" field.
    • Customize your watermark with other options in this dialog such as text size, text color, etc, then click "OK".
    • Watermark is now inserted into your document.

    B. To insert an image watermark:
    • Select the "Picture watermark".
    • Then click on the button "Select Picture...".
    • Navigate to the directory where your watermark picture is located. Select it and click "Insert".
    • Select a customized scale if desired, then click "OK".
    • The image is now inserted into your document as watermark

Turn ON/OFF Num Lock on Startup

Turn ON/OFF Num Lock on Startup

Most of standard keyboards come with a small numeric keypad which identified by the numbers from 0 to 9. However, this numeric keypad is also served for some other functions such as "Page Up", "Page Down", "End", "Home", etc... depending on which mode of the "Num Lock" is being used. Many Windows users find this numeric keypad useful to type the numbers faster. But oopps... after hitting a several keys on the numeric keypad, you recognize the outcomes are not what you expected. Then you recognize the "Num Lock" mode is "OFF", so you just need to switch it on, and... start over your typing! The bad news is, by default, Windows turns the Num Lock off; however, the good news is, you can configure Windows to turn this Num Lock ON so that whenever you mean "number", you really get a number.
Read on, you'll get the details how to set Windows to keep the Num Lock status "ON" as default. In fact, you will need to make a small change on your Windows Registry to turn the Num Lock ON everytime Windows starts up.
IMPORTANT This article will guide to some steps to modify your Windows Registry. Stop if you're not familiar with the Windows Registry. Making a wrong change on the Windows Registry could cause critical problems to your computer.
Proceed at your own risks
This tip modifies the Windows Registry. So be aware and careful when following the steps. Damage the Windows Registry might damage your Windows.
  1. Open the "Registry Editor" ("Start" >> "Run", then type "regedit" and Enter).
  2. Expand to the following key:
    HKEY_CURRENT_USER\Control Panel\Keyboard\
  3. Within the keyboard folder, you should have a string value named "InitialKeyboardIndicators" with a value of 0, 1, or 2.
  4. Double-click on this string value "InitialKeyboardIndicators" and edit the value to what you want. Below is the explaination of the values:
    0: Num Lock is turned OFF on startup
    1: Disable Num Lock
    2: Num Lock is turned ON on startup

Internet Connection Sharing on Windows XP

Internet Connection Sharing on Windows XP

This trick shows you how to share your internet connections on multiple computers within a workgroup with Windows XP. Windows XP has a built-in feature that called "Internet Connection Sharing" (ICS) that allows home users to share their internet connections on multiple computers.
If you are not familiar with the network configurations, the easiest way to share your internet connection is to purchase a router or hub. Use this trick only if you don't have a router, or don't want to use a router, or if you just want to try out the feature.
A simple way to understand this feature is, you are making your host computer (the computer directly connects to the internet) functioning as a router for other computers.

What do you need?
  • A "Host" computer that running Windows XP. This computer must have at least TWO (2) network adapters. One adapter - let's call it "Adapter #1" - connects to the internet and another, "Adapter #2", connects to a hub or directly to other computers.
  • Client computer(s), which run any version of Windows. A client computer can be connected to the host computer directly by a cross-over cable or indirectly through a hub.
  • This trick assumes that the host computer is connected to the internet and you are able to access the internet on this computer.

Configure the Host Computer
  1. Logon the host computer as Administrator.
  2. Click Start >> Control Panel.
  3. Click Network and Internet Connections.
  4. Click Network Connections.
  5. Right-click the connection that you use to connect to the internet (the connection with Adapter #1). This connection can be either a high-speed internet connection or a dial-up connection.
  6. Click Properties.
  7. Click Advanced tab.
  8. Under Internet Connection Sharing, select the Allow other network users to connect through this computer's Internet connection check box.
  9. If you are sharing a dial-up Internet connection, select the Establish a dial-up connection whenever a computer on my network attempts to access the Internet check box if you want to permit your computer to automatically connect to the Internet.
  10. Click OK. You'll reieve the following message:
    When Internet Connection Sharing is enabled, your LAN adapter will be set to use IP address 192.168.0.1. Your computer may lose connectivity with other computers on your network. If these other computers have static IP addresses, it is a good idea to set them to obtain their IP addresses automatically. Are you sure you want to enable Internet Connection Sharing?
  11. Click Yes.
Configure the Client Computer(s)
To use the shared connection from the Host computer, a client computer must be configured with "Automatic IP address". The main configurations are:
  1. Configure TCP/IP Automatic IP
  2. Configure Internet Connection
The steps for the above two configurations are vary on different versions of Windows.
The following procedures are for Windows XP client computers.
  1. Log on to the client computer as Administrator or as Owner.
  2. Click Start >> Control Panel.
  3. Click Network and Internet Connections.
  4. Click Network Connections.
  5. Right-click Local Area Connection, and then click Properties.
  6. Click the General tab, click Internet Protocol (TCP/IP) in the This connection uses the following items list, and then click Properties.
  7. In the Internet Protocol (TCP/IP) Properties dialog box, click Obtain an IP address automatically (if it is not already selected), and then click OK.


  8. Click Start >> Control Panel
  9. Click Network and Internet Connections.
  10. Click Internet Options.
  11. In the Internet Properties dialog box, click the Connections tab.
  12. Click the Setup button. The New Connection Wizard starts.
  13. On the Welcome to the New Connection Wizard page, click Next.
  14. Click Connect to the Internet, and then click Next.
  15. Click Set up my connection manually, and then click Next.
  16. Click Connect using a broadband connection that is always on, and then click Next.
  17. On the Completing the New Connection Wizard page, click Finish.
  18. Exit Control Panel and test the internet. You might need to restart the computer.

Create a bootable CD or DVD with or without floppy

Create a bootable CD or DVD with or without floppy

With the CD-ROM available on almost every computer nowaday, floppy drives become a history. However, for those who find computers a hobby, might run into a situation when they need to create a bootable CD that works just like the old floppy disk. Unfortunately, to do this, you still need a floppy drive to read your bootup floppy disk. Wait, the good news is, you can just down load a bootable ISO image and burn it to a CD. And even better, we have a copy of an ISO image right here. You can download this image and follow the instructions below, or you can do a web search for more options.
The information on this article will guide you step-by-step how to create a bootable CD/DVD, either using a bootup floppy disk or a boot image file. You will end up having a bootable CD or DVD, with CD-ROM driver supported, that could startup your PC and bring up the command prompt. This is going to be a good starting point, then you can run other utilities such as hard drive ghost, etc..
Many current CD/DVD burning software support the bootable feature. If you already have your favorite burning software, look around to find the bootable option. For this article, I will use the steps and sample screen-shots with the burning tool called Nero.
You will need a boot disk (floppy) or a bootable ISO image to start. If you don't have one, you can download an ISO image here. This boot image is Windows-98 based, which means it uses the Windows 98 bootup sequence, which should do what we need. You can also download different boot disk images from the internet. I've found bootdisk.com has a very good collection.
I assume that you already have Nero installed. Also, it is highly recommended to use a rewritable disc so you can redo the process if you have to.

  1. Launch Nero Burning ROM
  2. At the New Compilation Window, select "CD" from the drop-down menu and select "CD-ROM (Boot)" for CD, (or select "DVD" and "DVD-ROM (Boot)" for DVD)


  3. If you use a bootup floppy disk, insert the floppy disk and select "Bootable logical drive..."


  4. If you use an image file, select "Image File" then click "Browse" to browse to the image.

    At the "Open" Window, browse to the location where you saved the boot image and choose the image you wish to use and click "Open" (you might need to change the "Files of type" to "All Files" in order to see files with different extensions.)


  5. Click "New" at the New Compilation Window.
  6. Nero New Compilation Window disappears and Nero brings up its main screen where you can add more files to the CD/DVD if you wish. For example, adding a "ghost" folder with the file "ghost.exe" as follows.
    Once you're done adding all the files you wish to, click on the "Burn" icon.


  7. At the "Burn Compilation" Window, select "Burn"!

Microsoft Internet Explorer Shortcut Keys

Microsoft Internet Explorer Shortcut Keys

The followings are short-cuts for Microsoft Internet Explorer. Some keys are version specific
Use at your own risk.
Mouse shortcuts

Shortcut Description
Double-click (On a word) Select the word.
Triple-click Select entire line.
Wheel click Activate the Smooth scrolling
Hold Ctrl + Scroll Wheel forward Increase font size
Hold Ctrl + Scroll Wheel backward Decrease font size
Click one point then hold Shift & click another Create a selection from the two points


Keyboard shortcuts

Shortcut Description
F1 Help.
F3 Toggle on/off search panel.
F4 Pull down address bar.
F5 Refresh current page.
F6 Move focus to address bar.
F11 Toggle on/off full-screen mode
Alt + (Left Arrow) Go back on history. Same pas Backspace
Alt + (Right Arrow) Go forward on history.
Ctrl + A Select All.
Ctrl + B Favorites.
Ctrl + C Copy Selected.
Ctrl + E Search panel.
Ctrl + F Find (on page).
Ctrl + H Toggle History panel.
Ctrl + I Toggle Favorites panel.
Ctrl + L Open File. Same as Ctrl + O
Ctrl + N Open New browser window.
Ctrl + P Print current page / frame.
Ctrl + R Refresh. Same as F5
Esc Stop (while page is loading).
Ctrl + Enter Auto complete a url address. For example, type thecomputricks in the address bar and press CTRL + ENTER to get http://www.thecomputricks.com.
Ctrl + D Add the current page to favorite.

Microsoft Word Shortcut Keys

Microsoft Word Shortcut Keys

The followings are shortcut keys and mouse shortcuts that can be used for Microsoft Word
Use at your own risk.
Mouse shortcuts

Shortcut Description
Double-click (on a word) Select the word.
Single-click (anywhere in a sentence) + Holding CTRL Select the entire sentence.
Triple-click (anywhere in a paragraph) Select the entire paragraph.
Click, hold, drag, then release Select text from the click position to release position.
Click first position, hold SHIFT key, then click 2nd position Select text from the 1st position to the 2nd position.
Hold ALT key, then click and drag Vertical select text.
Hold CTRL key, then scroll wheel Zoom in/out.


Keyboard shortcuts

Shortcut Description
Ctrl + A Select all (including text, graphics).
Ctrl + B Bold.
Ctrl + I Italic.
Ctrl + U Underline.
Ctrl + C Copy.
Ctrl + V Paste.
Ctrl + X Cut.
Ctrl + F Find.
Ctrl + Z Undo.
Ctrl + Y Redo.
Ctrl + P Open the print dialog.
Ctrl + K Insert link.
Ctrl + L Left align.
Ctrl + E Center align.
Ctrl + R Right align.
Ctrl + M Indent.
Ctrl + (left arrow) Moves one word to the left.
Ctrl + (right arrow) Moves one word to the right.
Ctrl + (up arrow) Moves cursor to the beginning of the paragraph.
Ctrl + (down arrow) Moves cursor to the end of the paragraph.
Ctrl + Shift + F Change font.
Ctrl + Shift + * View/hide non-printing characters.
Ctrl + Del Deletes word to the right of cursor.
Ctrl + Backspace Deletes word to the left of cursor.
Ctrl + End Moves cursor to the end of document.
Ctrl + Home Moves cursor to the beginning of document.
Ctrl + Spacebar Reset highlighted text to the default font.
Ctrl + 1 Single-space.
Ctrl + 2 Double-space.
Ctrl + 5 1.5-line.
Ctrl + Alt + 1 Format text: heading 1.
Ctrl + Alt + 2 Format text: heading 2.
Ctrl + Alt + 3 Format text: heading 3.
F1 Help.
F4 Repeat the last action
F5 Go to .
F7 Spelling and grammar.
F12 Save as.
F8 then (left arrow) Increase selection to the left by one character
F8 then (right arrow) Increase selection to the right by one character
Ctrl + F1 Task Pane.
Ctrl + F2 Print preview.
Alt + Ctrl + F2 New document.
Shift + F3 Cycle between capitalized formats
Ctrl + Insert Copy.
Shift + Insert Paste.
Shift + End Select from current position to the end of the line.
Shift + Home Select from current position to the beginning of the line.
Ctrl + Shift + (left arrow) Select from current position to the beginning of the word.
Ctrl + Shift + (right arrow) Select from current position to the end of the word.
Ctrl + Shift + (up arrow) Select from current position to the beginning of the document.
Ctrl + Shift + (down arrow) Select from current position to the end of the document.
Ctrl + Shift + Page Up Select from current position to the beginning of the window.
Ctrl + Shift + Page Down Select from current position to the end of the window.
Shift + Page Up One screen page up.
Shift + Page Down One screen page down.
Shift + F7 Thesaurus check selected text.
Shift + F12 Save.
Ctrl + Shift + F12 Print.
Alt + Shift + D Insert the current date.
Alt + Shift + T Insert the current time.

Ghost Bootable SD Card or USB Flash Drive

Create Ghost Bootable SD Card or USB Flash Drive

It's a good practice to create an image of your hard drive before you start using it. Especially when you had to build that computer from scratch and spent hours installing the operating system and all of your favorite apps...

As Symantec Ghost becomes more user friendly, people start to recognize this idea. The idea also works well when you need to clean your PC from viruses. In case anything goes wrong with the operating system, you just need to restore the image using the Symantec bootable CD.

However, the problem comes when we deal with the new version of those small laptops: The netbooks! which usually don't come with a built-in CD-ROM drive to bootup the PC.
The most simple solution would be buying an external CD-ROM drive, which costs you money. And in some cases, you just want to bootup the Symantec Ghost.... with whatever available!


The good news: Almost every recent laptop/netbook comes with a card reader, and even if you wasn't lucky enough, your laptop/netbook should have a USB port!

This guide will tell you how to create a bootable SD card or a USB flash drive with Symantec Norton Ghost.
This task can be done with several different versions of Symantec Ghost; however, the steps from this articles are based on Symantec Ghost 14.


What you need?
  • Symantec Ghost 14 bootable CD. (Some other versions might also work)
  • A PC with bootable CD/DVD drive.
  • An SD card (either SD or SDHC), or a USB thumb drive. The size can be as minimum as 1 GB. You can also pick a large SD card if you want to store your hard drive image to the card as well.
  • An SD slot or a card reader (for SD card) or a USB slot (for thumb drive)

Follow the steps in order. Use this guide at your own risks.

  1. First, check to make sure your CD/DVD drive is bootable. (See your BIOS manual or PC user guide for details since this is out of the scope of this article).
  2. - For SD card: Make sure the SD slot or the card reader is available. if it's a card reader, connect it to the PC. Also insert the card.
    - For USB thumb drive: Make sure the drive is inserted into one of the USB slots.
  3. Bootup the computer using the Symantec Ghost CD (Details vary on different computers). On Windows XP, during the startup, you should see the prompt "Press any key to boot from CD...".
  4. Once the Symantec Recovery startup is complete, you should see the main screen of Symantec Ghost 14 Recovery similar to this image:


  5. Select "Analyze" from the left menu.


  6. Then click on "Open Command Shell Window". A command prompt window will display.

  7. At this command prompt window, type: "diskpart" (one word, without quotes) and hit enter. The prompt now changed to "DISKPART>"

  8. Now type "list disk" and hit enter. You should now see a list of all available disks. Base on the size of each disk listed, find the one that matching your SD card (or thumb drive) and note its disk number under "Disk ###". If you don't see your SD card (or flash drive) listed, verify if it is inserted or plugged in (you might need to restart the computer and try again).

  9. Type "select disk <n>" (replace <n> with the disk # noted from the previous step) then hit enter.
    Important!! Besure to select the correct disk (your SD card or thumb drive) as you will be erasing the drive.
    Sample image with a 4-GB SD selected:


  10. Create a primary partition for the the disk by executing the following sequence of commands:
    clean
    create partition primary
    select partition 1

  11. Set the primary partition active, type: "active" and hit enter

  12. Perform a quick format with the following command:
    format fs=fat32 quick

  13. Then type:
    assign
    exit

  14. Your SD card (or the flash drive) is now bootable and will act similar to a local hard drive. In order to boot this card with Symantect Ghost Recovery, copy all contents from the Symantec Ghost disc to the SD card (or the flash drive). Besure to copy everything including any hidden files/folders.

    The SD card or flash drive is now bootable and will boot your laptop/netbook to Symantec Ghost Recovery utilities exactly the same way as of the CD (To boot with the card on your laptop/netbook, don't forget to set your bios to search for the SD card or USB external devices in the boot sequen

Microsoft Excel Shortcut Keys

Microsoft Excel Shortcut Keys

The followings are Microsoft Excel shortcuts. Some short-cuts might be version specific.
Use at your own risk.
Mouse shortcuts

Shortcut Description
Double-click (on a cell) Edit the cell contents.
Double-click (on a row/column divider) Adjust height/width to auto-fit
High-light headers of multiple rows/columns then Double-click on a row/column divider Adjust height/width to auto-fit of all high-lighted rows/columns
Triple-click Select the entire contents in the cell
Click on row/column divider then drag Adjust height/width of the row/colunn
High-light headers of multiple rows/columns then Click on row/column divider then drag Adjust height/width of the rows/colunns
Ctrl + Mouse wheel Zooms in and out of document.
Hold Shift + Click the cells Select multiple cells


Keyboard shortcuts

Shortcut Description
F2 Edit the selected cell.
F5 Goto a specific cell. For example, C6.
F7 Spell check selected text and/or document.
F11 Create chart.
Ctrl + A Select all.
Ctrl + B Bold.
Ctrl + C Copy.
Ctrl + F Find (same as Shift + F5).
Ctrl + G Go To.
Ctrl + H Replace.
Ctrl + I Italic.
Ctrl + K Insert link.
Ctrl + N New Workbook.
Ctrl + O Open Workbook.
Ctrl + P Print dialog.
Ctrl + S Save.
Ctrl + U Underline.
Ctrl + V Paste.
Ctrl + Z Undo.
Ctrl + Y Redo.
Ctrl + X Cut.
Ctrl + 5 Strikethrough text.
Ctrl + F3 Define Name.
Ctrl + F4 Exit Excel.
Ctrl + F6 Switch between open workbooks.
Ctrl + F9 Minimize current window.
Ctrl + F10 Maximize current window.
Shift + F1 Activate Help on Item.
Shift + F2 Insert Comments
Shift + F3 Insert Function.
Ctrl + Shift + ; Enter the current time.
Ctrl + ; Enter the current date.
Ctrl + Page down Move to next worksheet.
Ctrl + Page up Move to previous worksheet.
Ctrl + Shift + # Number Format: Date
Ctrl + Shift + @ Number Format: Time.
Ctrl + Shift + ! Number Format: Commas.
Ctrl + Shift + $ Number Format: Currency
Ctrl + Shift + % Number Format: Percentage
Ctrl + Shift + ^ Number Format: Scientific.
Ctrl + Space Select entire column.
Shift + Space Select entire row.
Ctrl + (Arrow key) Move to next section.

Microsoft Windows Shortcut Keys

Microsoft Windows Shortcut Keys

This is a listing of some common shortcut keys in different versions Microsoft Windows.
Some shortcut keys below are not supported in all versions of Windows.
The shortcut keys on this page are only applicable for Windows in general, if you are looking for shortcut keys for a specific application (i.e. Excel, Word, etc..) please see the links at the bottom of this page.
Use at your own risk.
Shortcut Key Supported Window Versions Short Key Description
Alt + (double-click) 95, 98, ME, NT, 2000, XP, Vista Open Properties dialog of selected item.
Alt + Enter 95, 98, ME, NT, 2000, XP, Vista Opens properties window of selected item.
Alt + Esc 95, 98, ME, NT, 2000, XP, Vista Switch Between open tasks available on the taskbar.
Alt + F4 95, 98, ME, NT, 2000, XP, Vista Close the top (focused) window.
Alt + Tab 95, 98, ME, NT, 2000, XP, Vista Switch between open windows.
Alt + Tab + Shift 95, 98, ME, NT, 2000, XP, Vista Switch between open windows, backward.
Ctrl + Alt + Delete (or Del) 95, 98, ME, NT, 2000, XP, Vista Bring up the Windows Task Manager, or reboot computer.
Ctrl + Esc 95, 98, ME, NT, 2000, XP, Vista Bring up the Windows Start menu.
Ctrl + '+' ('+' key on the keypad) 98, ME, NT, 2000, XP, Vista Autofit the widths of all columns (if available) in current window.
Ctrl + F4 95, 98, ME, NT, 2000, XP, Vista Close sub window/tab.
Ctrl + Tab 95, 98, ME, NT, 2000, XP, Vista Switch between existing tabs (within a window).
Ctrl + Tab + Shift 95, 98, ME, NT, 2000, XP, Vista Switch between existing tabs (within a window), backward
F1 95, 98, ME, NT, 2000, XP, Vista Open Help for Windows or focused application.
F2 95, 98, ME, NT, 2000, XP, Vista Rename.
F3 95, 98, ME, NT, 2000, XP, Vista Find/Search.
F4 95, 98, ME, NT, 2000, XP, Vista Select drives or display the list of drives
F5 95, 98, ME, NT, 2000, XP, Vista Refresh.
F6 95, 98, ME, NT, 2000, XP, Vista Switch focus to the address bar (if exists).
F10 95, 98, ME, NT, 2000, XP, Vista Switch focus to the top menu bar.
Shift + F10 95, 98, ME, NT, 2000, XP, Vista Same as mouse right-click on the select item.
Print Screen 95, 98, ME, NT, 2000, XP, Vista Capture a screenshot of the entire desktop to clipboard.
Print Screen + Alt 95, 98, ME, NT, 2000, XP, Vista Capture a screenshot of just the top(focused) window to clipboard.
Shift + Delete (or Del) 95, 98, ME, NT, 2000, XP, Vista Permanently delete selected file(s)/folder(s) (bypass recycle bin)
Shift (hold while inserting an audio CD to drive) 95, 98, ME, NT, 2000, XP, Vista Prevent autoplay.
* (keypad) on Windows Explorer. 95, 98, ME, NT, 2000, XP, Vista Expand all sub-directories from the selected item.
+ (keypad) on Windows Explorer. 95, 98, ME, NT, 2000, XP, Vista Expand only the first level of selected item.
- (keypad) on Windows Explorer. 95, 98, ME, NT, 2000, XP, Vista Collapse
Most keyboards have a Windows Key (key with a Windows icon). This key provides additional shortcuts for Microsoft Windows. Below is a list of the shortcut keys by combining the Windows key and other keys.
Shortcut Keys Description
WINDOWS-KEY Bring up the Windows Start menu.
WINDOWS-KEY + F1 Bring up the Windows Help.
WINDOWS-KEY + e Open Microsoft Explorer.
WINDOWS-KEY + f Windows Search.
WINDOWS-KEY + Ctrl + f Search for computers
WINDOWS-KEY + d Minimizes all and bring up desktop, or restore all
WINDOWS-KEY + l Lock the computer (Windows XP & newer).
WINDOWS-KEY + m Minimizes all windows.
WINDOWS-KEY + Shift + M Restore all. Opposite with WINDOWS-KEY + M and WINDOWS-KEY + D.
WINDOWS-KEY + r Open the run window.
WINDOWS-KEY + u Utility Manager.
WINDOWS-KEY + Tab Cycle through the programs on task bar.
WINDOWS-KEY + Pause/Break Open the System Properties window.

Burn CD without software in Windows XP

Burn a CD on Windows XP without using software

Windows XP comes with a builtin CD-copy feature that not many people are aware of. Although almost everyone has his/her favorite CD-copy software to stick with, it is still good to know about this CDR feature from Windows XP. You will find it very useful when you come to another PC that doesn't have a CD-copy software, and you can't just install your favorite software to it. With this feature, you can write some data or MP3 files to a CD/DVD, or erase a re-writable CD/DVD.
If you're using a Re-Writable CD (CD-RW), make sure the disc is blank. You might need to erase (or "format") it before use. For information how to erase a CD-RW on Windows XP without using any other software, see

Requirements: You need to enable the CD-R feature on Windows XP. If you haven't done so, see


  1. Insert a Formated-ReWritable CD or a Recordable (CD-R) disc into the CD drive.
  2. From Desktop, double-click on "My Computer".
  3. Navigate to the files/folders you want to copy to CD. Select them and press "Ctrl-c" to copy.
  4. Browse back to the CD-ROM, and press "Ctrl-V" to paste. The files/folders will show up as temporary files/folders at this time.


  5. On the left panel, select "Write these files to CD".


  6. The window "CD Writing Wizard" appears with the default CD name. Change the CD name if you wish, then click "Next".


  7. The "CD Writing Wizard" starts to write files/folders to the CD:


  8. Once the writing process is complete, the wizard will disappear and the CD-Rom will be ejected.

Command Prompt on Right-Click

Command Prompt on Right-Click

Many computer users, specially the programmers, need to launch a command prompt window every once in a while to execute some dos/shell commands. The problem is, when a command prompt window launched, the default path is normally the system path or the user profile's path. The users will then have to do all the "cd" commands to change the directories to the path he/she wants.
This trick shows you how to add an option called "Command Prompt" when you right-click on a folder in Windows. With this option, a Command Prompt Window will launch and its current directory will be the path to the folder you've selected.
Use this trick at your own risk.
Here's what you'll get:


The Solution
You can either edit your registry OR download the registry file and apply it on your computer.
Method I. Manually edit the registry:
  1. Start > Run
  2. Enter "regedit" and hit Enter
  3. Expand to "HKEY_LOCAL_MACHINE\SOFTWARE\Classes\Folder\shell"
  4. Right-click on "shell" and select New > Key
  5. Make sure a new key is created under "shell". Change the name of this key to "Command Prompt"
  6. Right-click on this new key "Command Prompt" and select New > Key
  7. Change the name of this key to "command"

  8. Here's what we should have:

  9. Double-click on the "(Default)" text on the right window to bring up the edit box
  10. Enter this text into the Value Data field:
    cmd.exe "%1"
  11. Click OK and close the registry.
Method II. Download and apply the registry file:
  1. Download this registry file 
  2. Unzip it to a temp folder, then double-click on the .reg file to add the registry data.

Hide Files or Folders Using Command Prompt

Hide Files or Folders Using Command Prompt

Trick to hide files and folders using Command Prompt
The most important thing is that, once hidden with this method, the files/folders cannot be viewed by any search options even if you click "Show All Hidden Files and Folders".

Hiding the most wanted files and folders is very important nowadays and it's really a tedious job too. In order to make this tedious job an easy one, i'm going to deliver you a the trick now.

For Example: You have a folder named "collegephotos" and this folder is stored in (Disk Drive E). You think that it should not be seen by strangers who use your PC.

For that you need to follow the following instructions


  1. Press windowkey+R: Run command dialog box appears.
  2. Now type "cmd" and hit enter. A command prompt window displays.
  3. Now type "attrib +s +h E:\collegephotos" and hit enter.
  4. The folder "collegephotos" will be hidden (Note: It cannot be viewed by any search options)

    (To view this folder again, use the same command but replace '+' with '-' on both flags 's' and 'h')

Any Folder as Photo Folder

Reset Windows Password

Reset Windows Password

Forgot your administrator password? Don't panic, it happens to some other people too, and you have found the solution! The following instructions will show you step-by-step how to reset your local Windows password. This only works for local user accounts, however, not domain accounts.The password recovery tool from this page is written by Petter Nordahl-Hagen, and the original information, as well as the downloadable tool, can be found from his website. According to the author, this tool should work for Windows NT/2000/XP/Vista.
WARNING! Users who have EFS encrypted files on the Windows XP or Vista computers will loose access to the EFS encrypted files after recovery of your password!

Use this trick at your own risks
The tool to reset your password can be downloaded here.

I. Download the bootdisk:
  1. Download the bootdisk, which includes the password recovery tool here. The file contains the ISO CD image.
  2. Unzip (extract) the ISO file and burn it to a CD. Note that this is an ISO file, you must burn it to CD as an ISO image, not as a "data" file. If you're not sure how, see this article. Also, the image is bootable, you need to burn the image to a CD using the image burning feature; do not extract the contents of the ISO and burn them to the CD, you'll end up with a CD that can't boot!

II. Understanding the process:
  • You'll use the bootdisk created from the above steps to bootup your computer, which you want to reset your administrator password.
  • You'll be asked for things like: which drive is the boot drive, which path to the SAM file, etc.. but don't worry, details will be provided.
  • Once you have selected an account to reset the password, you'll need to type in a new password; however, it is highly recommended to use a BLANK password at this point, then you can change your password later in Windows.
  • Follow the prompts to the end. You'll need to save the changes at the end!

III. OK! Enough talking. Here are the steps:
  1. Startup your computer with the bootdisk created above. You should see a welcome screen following with a prompt:
     boot:
    
  2. Just wait, the bootup process will continute automatically. Then you should see a screen similar to this:
     =========================================================
     . Step ONE: Select disk where the Windows installation is
     =========================================================
     ....
     NT partitions found:
      1 :   /dev/sda1    4001MB  Boot
      2 :   /dev/sda5    2148MB
     
     Please select partition by number or
     a = show all partitions, d = automatically load new disk drivers
     m = manually load new disk drivers
     l = relist NTFS/FAT partitions, q = quit
     Select: [1]
    
  3. Notice the last line "Select: [1]" which shows the [1] as default selection because the tool detected the bootup partition is [1]. This might be different on your own machine, so you should review the list shown under "NT partitions found:". The partition with the word "Boot" should be selected.

  4. Hit Enter once you confirm the selection. You should see a similar screen as follows:
     =========================================================
     . Step TWO: Select PATH and registry files
     =========================================================
     ....
     What is the path to the registry directory? (relative to windows disk)
     [windows/system32/config] :
    
  5. Notice the last line "[windows/system32/config]" which shows the default path. This was also detected by the tool. If the path is correct, hit Enter, or if you wish to enter a different path, enter it now then hit Enter.
    Here are the paths for different versions of Windows:
    - Windows NT 3.51: winnt35/system32/config
    - Windows NT 4 and Windows 2000: winnt/system32/config
    - Windows XP/2003 (and often Windows 2000 upgraded from Windows 98 or earlier): windows/system32/config

  6. Once you hit "Enter", you should see the next screen similar to the following:
     -r--------    1 0        0          262144 Jan 12 18:01 SAM
     -r--------    1 0        0          262144 Jan 12 18:01 SECURITY
     -r--------    1 0        0          262144 Jan 12 18:01 default
     -r--------    1 0        0         8912896 Jan 12 18:01 software
     -r--------    1 0        0         2359296 Jan 12 18:01 system
     dr-x------    1 0        0            4096 Sep  8 11:37 systemprofile
     -r--------    1 0        0          262144 Sep  8 11:53 userdiff
    
     Select which part of registry to load, use predefined choices
     or list the files with space as delimiter
     1 - Password reset [sam system security]
     2 - RecoveryConsole parameters [software]
     q - quit - return to previous
     [1]
    
  7. Hit "Enter" with the default option selected "[1]". Then ...:
     =========================================================
     . Step THREE: Password or registry edit
     =========================================================
     Loaded hives:   
    
       1 - Edit user data and passwords
       2 - Syskey status & change
       3 - RecoveryConsole settings
        - - -
       9 - Registry editor, now with full write support!
       q - Quit (you will be asked if there is something to save)
    
     What to do? [1] -> 1
    

  8. Hit "Enter" with the default option selected "[1]". Then ...:
     ===== chntpw Edit User Info & Passwords ====
    
     RID: 01f4, Username: <Administrator>
     RID: 01f5, Username: <Guest>, *disabled or locked*
     RID: 03e8, Username: <HelpAssistant>, *disabled or locked*
     RID: 03eb, Username: <pnh>, *disabled or locked*
     RID: 03ea, Username: <SUPPORT_388945a0>, *disabled or locked*
    
     Select: ! - quit, . - list users, 0x<RID> - User with RID (hex)
     or simply enter the username to change: [Administrator]
    

  9. Hit "Enter" with the default option selected "[Administrator]", or select another user account. Here you can enter the full user account surrounded by < and >, CASE-SENSITIVE, or enter the RID number (i.e. 0x1f4). Assuming you select the Administrator account, you should see the following screen:
     RID     : 0500 [01f4]
     Username: Administrator
     fullname: 
     comment : Built-in account for administering the computer/domain
     homedir : 
    
     Account bits: 0x0210 =
     [ ] Disabled        | [ ] Homedir req.    | [ ] Passwd not req. | 
     [ ] Temp. duplicate | [X] Normal account  | [ ] NMS account     | 
     [ ] Domain trust ac | [ ] Wks trust act.  | [ ] Srv trust act   | 
     [X] Pwd don't expir | [ ] Auto lockout    | [ ] (unknown 0x08)  | 
     [ ] (unknown 0x10)  | [ ] (unknown 0x20)  | [ ] (unknown 0x40)  | 
    
     Failed login count: 0, while max tries is: 0
     Total  login count: 3
    
     * = blank the password (This may work better than setting a new password!)
     Enter nothing to leave it unchanged
     Please enter new password: *
    

  10. At the prompt "Please enter new password", Enter the * for a blank password (HIGHLY RECOMMENDED!) then press Enter
     Please enter new password: *
     Blanking password!
    
     Do you really wish to change it? (y/n) [n] y
    

  11. At the prompt, type in "y", then press Enter. Note that the default option is "n".
     Do you really wish to change it? (y/n) [n] y
     Changed!
    
     Select: ! - quit, . - list users, 0x - User with RID (hex)
     or simply enter the username to change: [Administrator] !
    

  12. Enter the "!" to go back to the main menu. Then select "q" at the following menu to quit:
     <>========<> chntpw Main Interactive Menu <>========<>
    
     Loaded hives:   
    
       1 - Edit user data and passwords
       2 - Syskey status & change
       3 - RecoveryConsole settings
        - - -
       9 - Registry editor, now with full write support!
       q - Quit (you will be asked if there is something to save)
    
     What to do? [1] -> q
    

  13. A prompt to save changes displays, enter "y" to save:
     =========================================================
     . Step FOUR: Writing back changes
     =========================================================
     About to write file(s) back! Do it? [n] : y
    

  14. The changes are saved! You should see the following screen, press Enter, and reboot your computer.
     Writing  sam
    
     ***** EDIT COMPLETE *****
    
     You can try again if it somehow failed, or you selected wrong
     New run? [n] : n